 Reference
![]()
![]()
![]()
![]()
![]()
Introduction
Clarity is a logging framework that prints log data referenced from JSON to the console using semantic formatting.
Clarity assumes three main ‘nodes’ of interest in an application control flow: function call points, the resolution of conditional statements and the reporting of specific values including errors. Clarity print statements are designed to be placed at such node points in the client application code.
All message data relating to each print statement is placed entirely in associated JSON files referenced by a unique number. This enables the printing of an unlimited amount of information to the console with negligible impact on the source code.
The log output formatting is designed to emphasise nodes of interest in a clear narrative of the control flow instantly understandable by anyone – including non-developers. Settings enable the isolation of specific elements and referenced data.
Fully native and compatible with all Apple platforms, 100% stable, lightweight, and lightning fast – Clarity is a must-have framework for all Xcode projects.
Table of Contents
- Features & Benefits
- Usage
- Structure of Clarity print statements
- Requirements
- Installation
- Activation
- Reference & Docs
- Donations
Features
Complete granular control of all logs printed to the console:
- isolate entities, functions or collections of specific print statements.
- display function names or control nodes only.
- switch all printing on or off.
Deactivate printing for release without removing print statements:
- Keep Clarity print statements intact yet inert in the code source.
All print log data is separated from the source code:
- each JSON data point is referenced by a single unique print number.
- the JSON data is accessed as project files that are editable within Xcode.
- significantly reduce the chance of introducing regressions through accidental deletions such as can occur when editing print statements in source.
Public API with a negligible footprint to help maintain clean code:
- Clarity print statements overload the familiar Swift print() function.
- simple, quick and intuitive to add log references.
- reduces the impact of logging on source code to the absolute minimum.
Output design easily read as a clear narrative of the control flow:
- control flow logs printed as concise ‘event – effect’ pairs.
- each statement tagged by entity code, function and print number.
- quick to find nodes of interest in the code using the statement tags.
- custom or relative numbering system for tagging functions and control flow nodes.
Output formatted using semantic assignment of symbols:
- aids clear visual detection of anomalies in the control flow.
- semantic symbols can be set to coloured Apple symbols.
- fully customisable settings for formatting, symbols and display.
Values and Errors can be passed as arguments to print statements:
- the log output of value arguments formatted as an easily readable list.
- any
LocalizedErrorautomatically displayed as aNSLocalizedStringwritten for the specific custom error case.
Number tag sequence only display:
- concise and space efficient yet potentially comprehensive list of control flow nodes.
- use to help track paths through complex algorithms.
- trace the source of intermittent errors using overlaid transparencies.
SwiftUI support:
- print output from within
bodyvars and view modifiers.
Easy to install and use:
- unambiguous instructions
- no terminal use, build phase scripts or third party application required.
Written entirely in Swift without third party dependancies.
Comprehensive API docs website and reference documentation
Usage
Use judiciously as a tool for logging print statements during project development or comprehensively at all node points to gain rapid understanding of an existing third party code base.
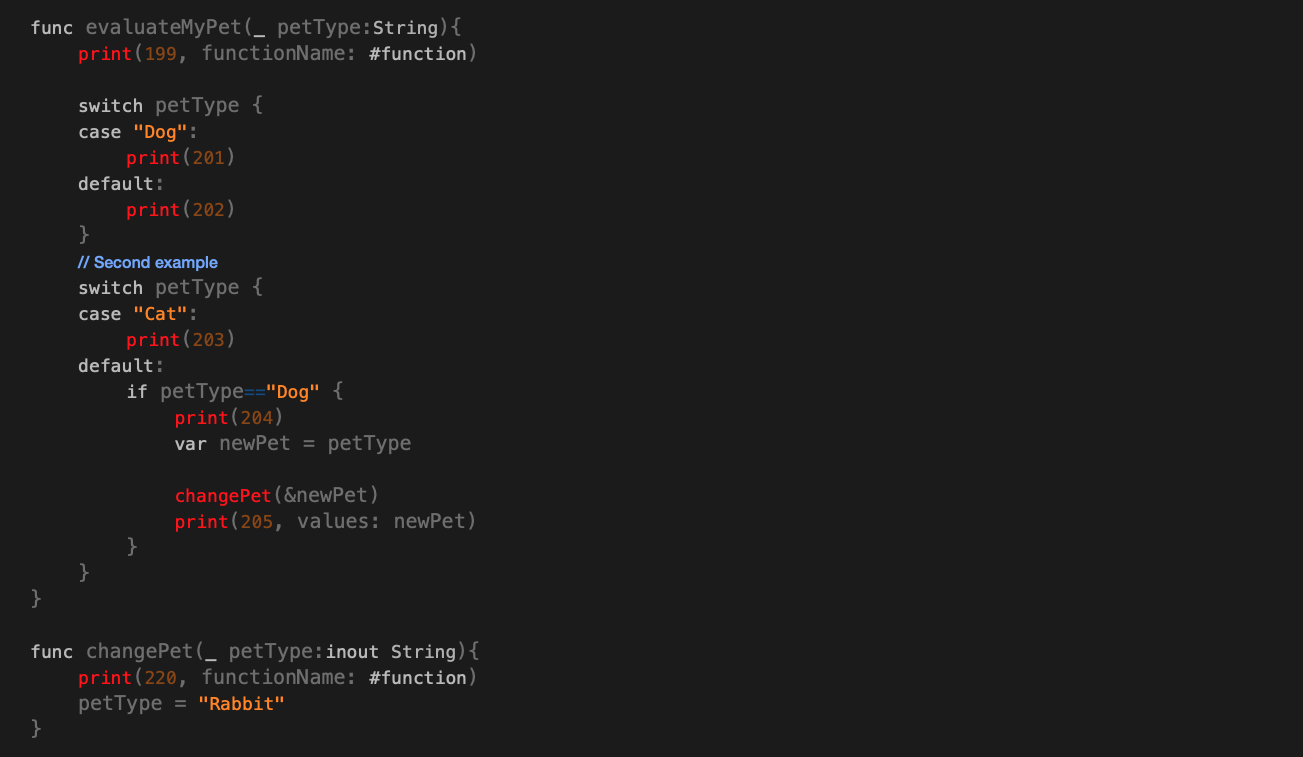
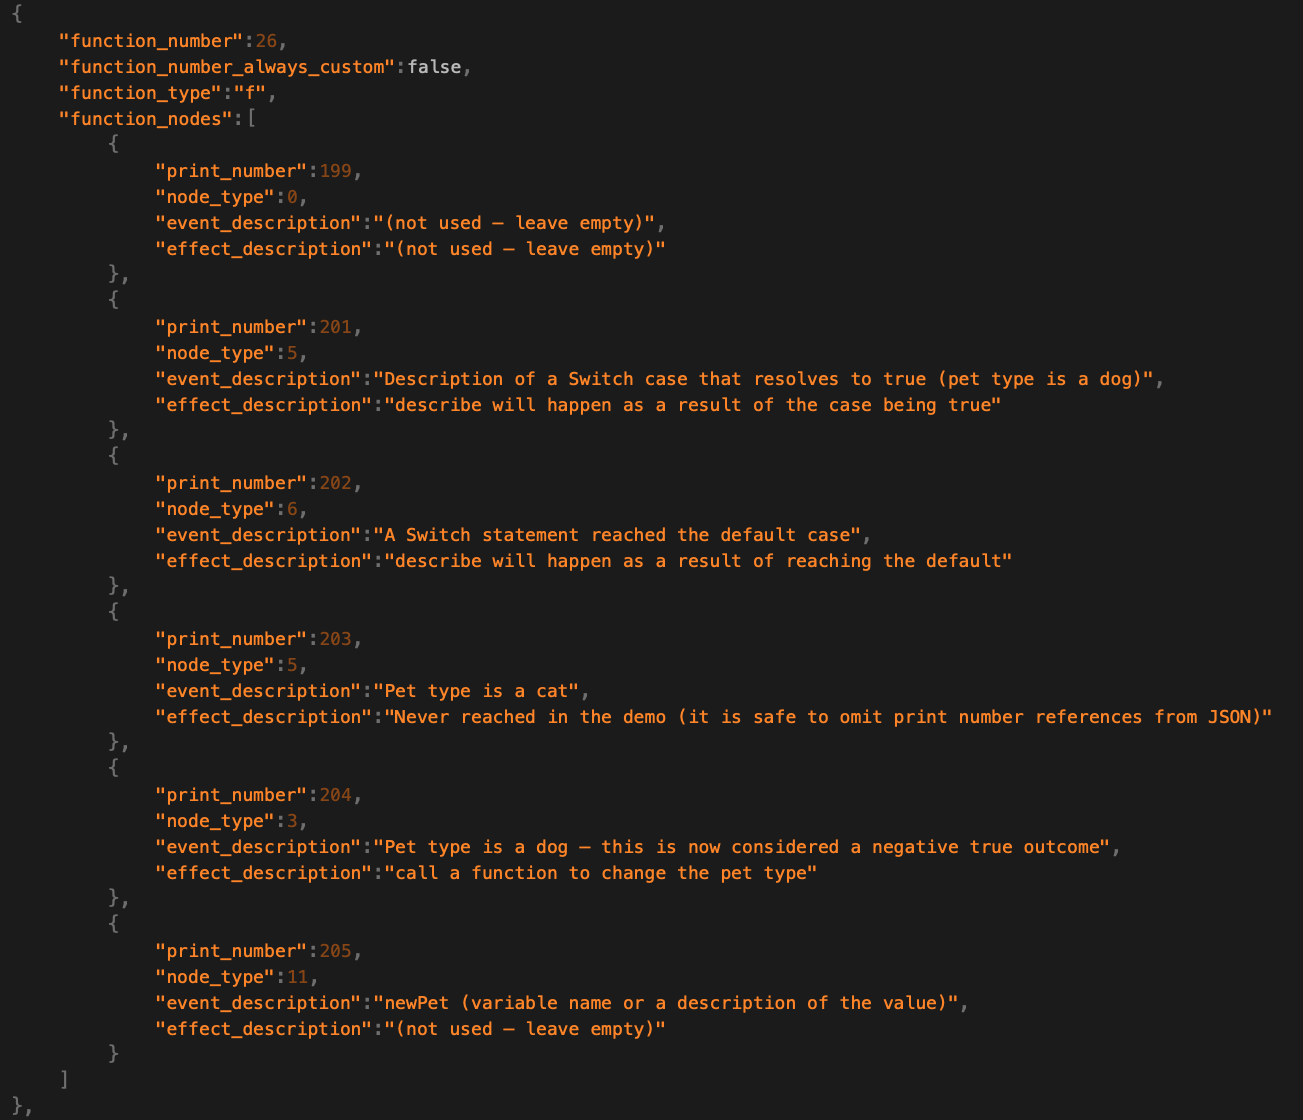
Screenshots from example project
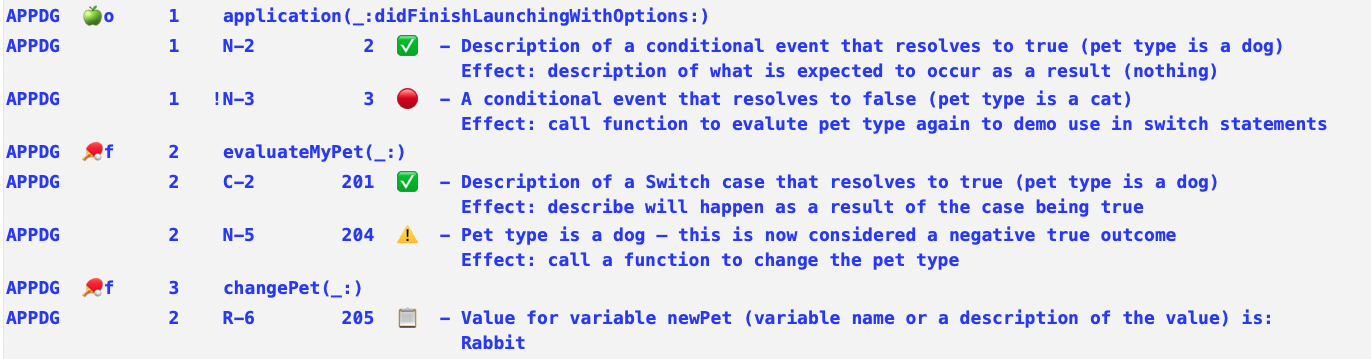
Clarity print statements in source code
Log JSON data associated with the print statements
Log output for the print statements
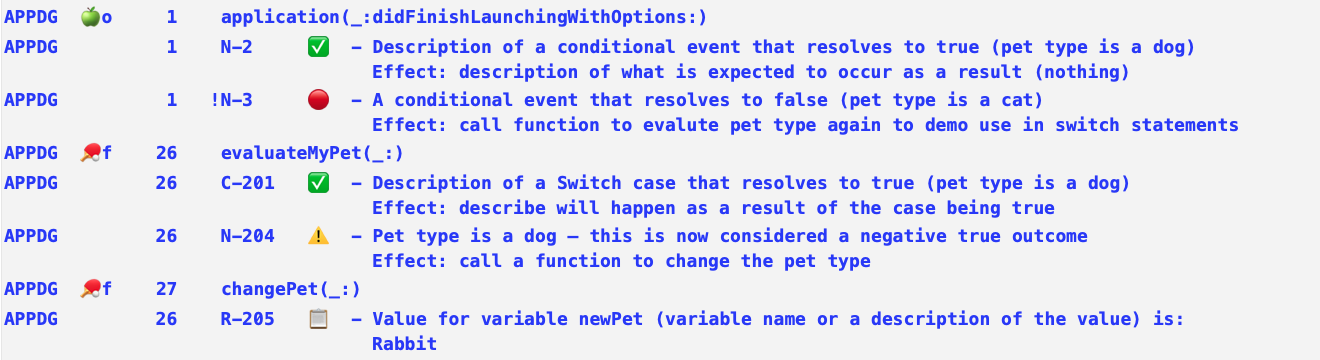
See example code for full details.
Display options
Different display options are controlled using a combination of keys in the Settings json file, the Formatting json file and keys within the associated EntityLogService json file.
Display options can be used to isolate issues of concern, change the numbering system or reducing the amount of formatting components displayed.
| Key | Value |
|---|---|
| calculateFunctionNumbersRelativeToEntity | true |
| calculateNodeNumbersRelativeToFunction | true |
| displayNodePrintNumberWhenUsingRelativeNumbering | true |
Log output – in light mode
Display log output as a number sequence
Settings used in extract
| Key | Value |
|---|---|
| suppressLogFunctionNames | true |
| displayNodeSequenceWithoutDescriptions | true |
Log output – in light mode

There are many more ways to display Clarity print statements: see additional examples of using different node types and display options.
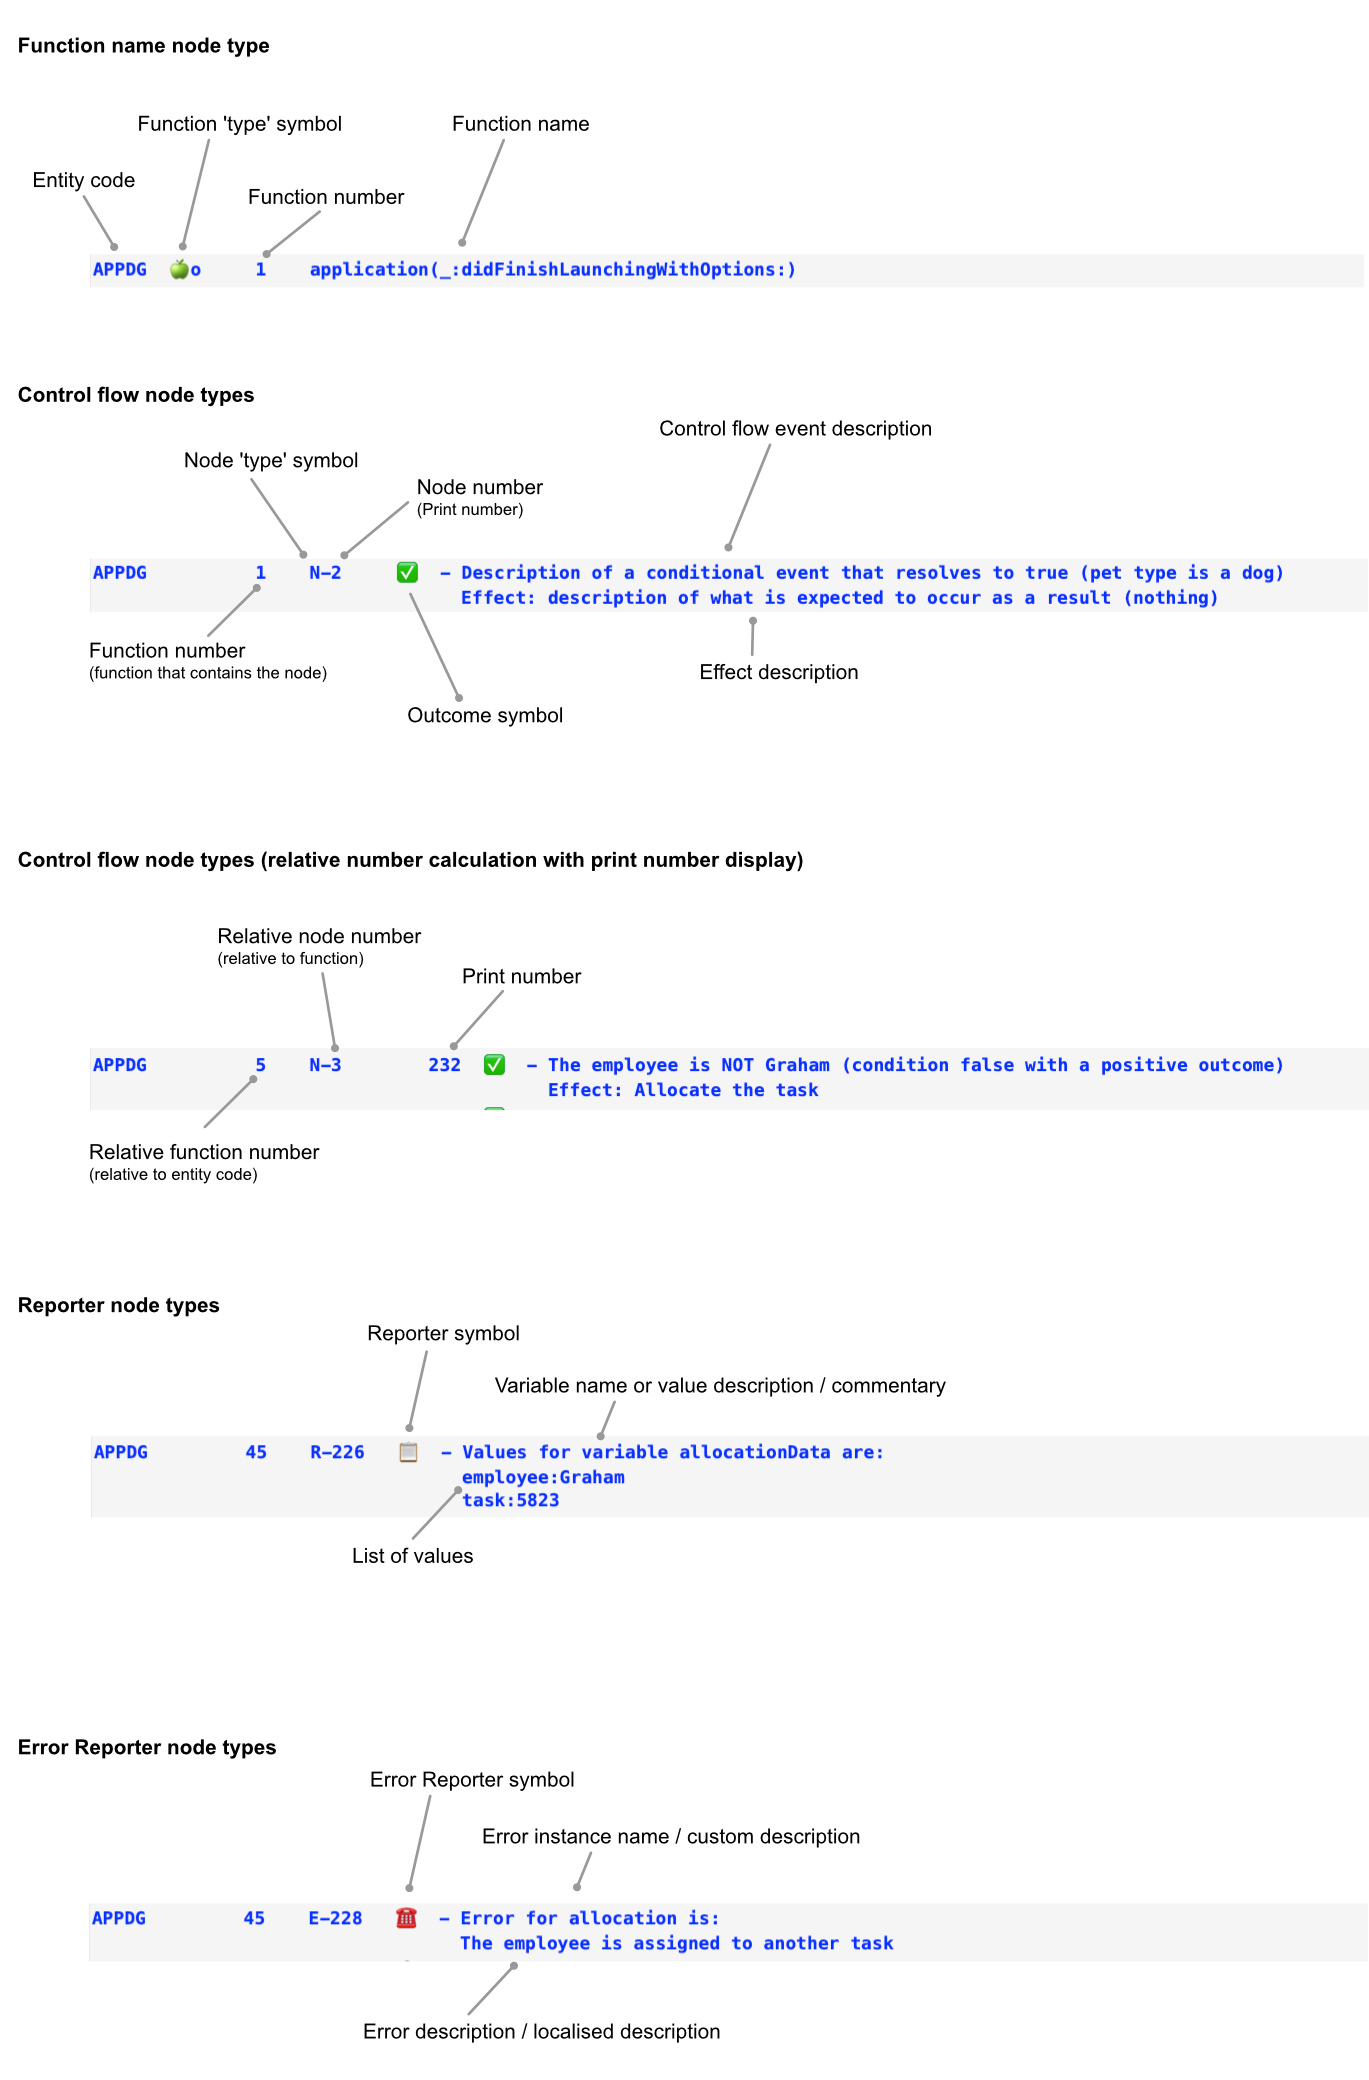
Structure
Clarity print statement components in the console
Requirements
| Platforms | Minimum Swift Version | Installation | Status |
|---|---|---|---|
| iOS 14.5+, macOS 11.2+, tvOS 14.5+ , watchOS 7.4+ | 5 | Swift Package Manager, XCFramework, Embedded Framework (using git submodules) | Fully Tested |
Installation
Swift Package Manager
Project navigator > PROJECT > Swift Packages > click Add Package Dependency (plus) icon
Browser > ‘Choose Package Repository: Search or enter package repository URL’ (enter)
https://github.com/real-intelligence/Clarity.git‘Rules’ > (check) ‘Version: Select Up to Next Major’ ( Xcode will automatically fill latest tag number ) > Next…
‘Choose package products and targets: Package Product’
- Ensure Clarity is checked
- ‘Add to Target’ > (select) YourProjectName
- Finish
XCFramework
Each release will include a single clarity.xcframework framework binary that can be added to all Apple platforms.
- Navigate to latest release > https://github.com/real-intelligence/Clarity/releases
- Assets > Clarity.xcframework.zip > click to download
- Doubleclick to expand the downloaded zip file > move Clarity.xcframework to a convenient location.
- (open) YourProjectName > Project navigator > ProjectName > TARGET > ProjectName > General Tab…
- Finder > (select) Clarity.xcframework > Drag and drop it into the Frameworks, Libraries, and Embedded Content of YourProjectName or Frameworks and Embedded Content of YourProjectName if it is itself a framework.
- Cmd+B to build the project.
Embedded Framework
Ensure that your project is initialized as a git repository.
Navigate to your project root folder > (right click) New Terminal at Folder
Add Clarity as a git submodule by running the following command:
$ git submodule add https://github.com/real-intelligence/Clarity.git
Your project root folder > Clarity > (Select) Clarity.xcodeproj Drag the icon into the Project Navigator of your application’s Xcode project
It should appear nested underneath your application’s blue project icon.
Project Navigator > Clarity.xcodeproj > PROJECT > Deployment Target … Ensure the specific platform deployment target matches (or is less than) your application target
Project Navigator > Your project (xcodeproj) > TARGETS > General > Frameworks, Libraries, and Embedded Content
Click Add Items (plus icon)
(select) Clarity(relevant platform).framework
Activation
Activation procedure
Add the Clarity activation initialiser (with Clarity
importstatement) at the entry point of the client application. See specific instructions and sample code for particular life cycles / project type below.Run the client application in any Xcode device simulator.
A folder containing template and default settings JSON files named ClarityJSONwill be copied to the desktop. See note regarding macOS
- All platforms except watchOS: Drag the folder named ClarityJSON from the desktop into: Xcode > Project Navigator > under (as a child of) the ProjectName icon.
watchOS only: Drag the folder named ClarityJSON from the desktop into: Xcode > Project Navigator > under (as a child of) the ProjectName Watchkit Extension folder.
- In the pop up window that appears:
- check Destination: ‘Copy items if needed’
- select ‘Create folder reference’
- check ‘Add to targets:’ > ‘ProjectName’
All platforms except watchOS:
Xcode should place the directory at the top level of your project in the same directory containing the .xcodeproj file.
watchOS only:
Xcode should place the directory in the top level of the Watchkit Extensionfolder.
In all instances the folder should be coloured blue.
Copy and rename the EntityLog JSON template files for each entity (struct, class or enum) where Clarity print statements are required. Additional EntityLog JSON files can be added at any time.
Copy or move ExampleEntityLog.json to a separate location for reference and delete it from the ClarityJSON folder.
Important
Settings.json and Formatting.json must NOT be renamed, deleted or have their keys altered (the default values can be edited as required).
- Add Clarity print statements to the project source code as required with an
import Claritystatement in each separate file.
Activation notes
Important: The Clarity activation initialiser should only be called once in an application.
Swift Package installations require import Clarity for all platforms
XCFramework installations require platform specific imports:
- macOS :
import Clarity - iOS :
import Clarity_iOS - WatchOS :
import Clarity_watch - tvOS :
import Clarity_tv
If the displayStatus parameter is omitted or set to true – the print mode and activation status of Clarity will be displayed at the top of the console output on initialisation.
Running Clarity for the first time in a macOS application will likely cause a denied permissions issue when attempting to copy ClarityJSON to the desktop.
In this situation do one of the following steps:
- temporarily switch the scheme to run once in a simulator and create the ClarityJSON on the desktop
- download the folder named TemplateJSON from the GitHub repository and rename it to ClarityJSON
- locate the copy of the TemplateJSON folder in the client project DerivedData, rename the folder to ClarityJSON
Specific activation examples
SwiftUI App
Create a custom initialiser (if one does not already exist) for the type annotated with the @mainattribute that conforms to the App protocol (the entry point of the application).
Add Clarity activation to the custom initialiser.
import Clarity

@main
struct ClientForBigSuriOSApp: App {

  init() {

   ClarityActivator(withBundle: Bundle.main, inPrintMode:true, displayStatus:false)

   ...
 }
App Delegate
Add Clarity activation to application(_:didFinishLaunchingWithOptions:)
import Clarity
...

func application(_ application: UIApplication, didFinishLaunchingWithOptions launchOptions: [UIApplication.LaunchOptionsKey: Any]?) -> Bool {

 ClarityActivator(withBundle: Bundle.main, inPrintMode:true, displayStatus:false)

 ...
}
Framework as a client application
Framework applications that have a single entry point or activation method should simply add Clarity activation to that method.
Important: framework applications need to call the Bundle initialiser init(for:)supplying the implementing class as argument to the aClass parameter to access the correct Bundle for the framework.
ClarityActivator(withBundle: Bundle(for: MyImplementingClassName.self),
                  inPrintMode: true, displayStatus:false)
Framework as a client without a single entry point
Framework applications that do not have a single entry point will need to implement a class that includes a static variable that lazily stores the result of a closure containing the Clarity activation initialiser. The closure will then need to be accessed by all classes, structs or enums that use Clarity. This technique ensures that Clarity is activated only once and that any failure to activate Clarity will not adversely affect the client framework.
//Activation in a custom class 'ClarityService'
import Clarity

class ClarityService {

 static let clarityActivation: ClarityActivator? = {

    return ClarityActivator(withBundle: Bundle(for: ClarityServiceExample.self),
                                            inPrintMode:true, displayStatus:false)
  }()
}

//Accessing the activation from another class 'MyClass'
import Clarity

class MyClass {
            public init() {
            // All other essential initialisation work here …

             guard let _ = ClarityService.clarityActivation else{
                 print("Clarity activation failed")
                 return
             }
             // Place a Clarity print statement for the initialiser here if required.
         }

      // Clarity print statements can now be placed anywhere in the class (struct or
      //  enum) as usual.
}
Reference
All reference materials can be found on the realint.org site https://realint.org/clarity/reference/
Full developer API docs can be found here.
Public API docs can be found here.
Credits
Clarity – created and maintained by Lawrence Heyfron.
Contributions
If you like Clarity and want to support the project please let other developers know that the framework exists – tutorial creators are especially encouraged!
Feedback, code contributions, issues and pull requests including unit tests that add to the test coverage are welcomed. By making contributions to this project you give permission for your code to be used under the same license.
Contribution guidelines
- Make a separate pull request for each new feature or bug fix.
- Include descriptive commit messages.
- Include unit tests that cover each new feature.
It would be great to know about projects using Clarity!
Donations
If you would like to support the maintenance of Clarity by making a donation any amount would be greatly appreciated.
If you use Clarity within an organisation or company ask if your employer might consider donating.

License
Copyright © 2021 Lawrence Heyfron https://realint.org/
Clarity is released under the MIT license. See LICENSE for details.